Site Content
Installing a Tonneau Cover
If you drive one of the roadster models, a tonneau cover can be a handy addition. I have always had a tonneau cover on our various TRs since the first one, over 50 years ago. I have installed tonneau covers on TR3, TR4, TR6 and Spitfire models. Installation is pretty straight forward and relatively easy, provided you take your time, think things through, and work carefully. Regardless of model, the main fasteners are usually snap fasteners and/or lift-the-dot fasteners. Occasionally, you might find an eyelet fastener. Most tonneau covers come with a separate package of the required fasteners. With the number of tonneau covers and tops that I have installed over the years I have acquired a few specialist tools that make the job easier but the first few I ever did, I used basic tools and improvised.

Site Content
Photo 1 shows some of the tools used in the installation process. From left to right:
1. Ball peen hammer
2. 1/8” hollow punch and soapstone marker
3. Lift-the-Dot (LTD) punch and tape measure
4. Box cutter
5. LTD hand punch cutter and Pres-N-Snap installer
6. Needle nose pliers
7. Cushioned grip pliers
Most roadsters will have the LTD studs and/or snap studs already installed on the body work so our task will be to correctly mark the position of the required sockets on the tonneau material, punch the appropriate holes in the material, and install the sockets.
For illustration purposes in this article I have photos of a TR4 install but the process is the same for TR2, TR3, TR3A, TR4, TR4A, TR250, TR6 and Spitfire. I use chalk or soapstone to mark the tonneau material so that it can be cleaned off easily when complete. For starters, fold the tonneau in half lengthwise to find the centreline and place a mark on the rear edge.

Photo 1-Tools
Site Content
In the case of the TR4 (Photo 2), there are 16 LTD fasteners on the rear cockpit surround, six snap fasteners on the doors, and four snap fasteners on the dash. On the original TR4 tonneau cover, the dots on the LTD fasteners face outward from the centre of the rear cockpit such that they can easily be undone by starting at the side window and moving backward and around to centre. That is how we will install this set.
We will start at the rear cockpit. There is not a stud at centre so we will measure the centre to centre distance between the two most centre studs. An LTD fastener will be installed at half this distance on either side of the centreline mark made earlier.

Photo 2 - LTD Fasteners
Site Content
Mark the location of these two LTD fasteners on the tonneau material (Photo 3). Note: when placing these marks, ensure that the forward edge of the tonneau will reach the fastener studs on the dash at the base of the windshield. Align the centre of the LTD punch with the mark, place a cutting mat or piece of wood under the material, strike the punch with a hammer to make the necessary cuts in the material. If you do not have the LTD punch, you could use an LTD socket to mark the holes for the fastener and an X-acto knife or box cutter to cut the holes BUT cut carefully!
The top of the LTD socket is pressed through the cuts and the cinch plate is placed on the underside such that the tabs from the socket pass through the corresponding openings in the cinch plate. Using the cushion grip pliers, press the two surfaces tightly together and then use the needle nose pliers to fold over the tabs such that they tightly grip the cinch plate.
Install the cover on the car by snapping the two installed LTD fasteners on their studs. Stretch the fabric tightly into position over the adjacent stud and mark the location of the stud by rubbing chalk on the top side of the cover against the LTD stud. Repeat for the other adjacent stud. Remove the cover from the car. Use the LTD punch and install the next two fasteners. Place the cover back on the car by attaching the four LTD fasteners to their studs. Repeat the process of marking the stud locations and installing the next two fasteners until all the LTD fasteners around the rear cockpit have been installed.

Photo 3 - Marked Location of Fastener
Site Content
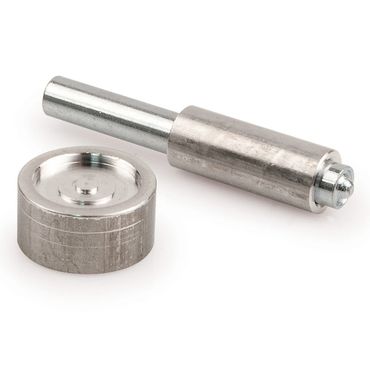
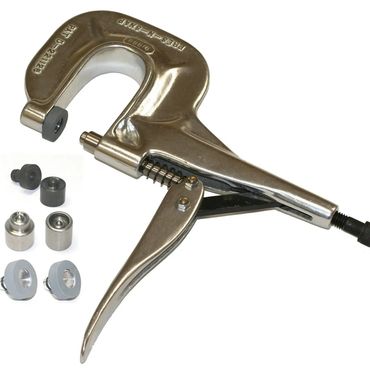
Each door has three snap fasteners (Photo 4). Continue the process of installing the next two fasteners by installing the cover with all the previous fasteners and mark the closest snap stud on the door. Remove the cover, place it over a cutting mat or piece of wood, and using the hollow punch and hammer (or an awl) punch a hole at the centre of the marked area. Home Depot and many hardware/hobby stores carry an inexpensive snap fastener tool (Photo 5) or if you plan to do many snap fastener installs, the Press-N-Snap tool (Photo 6) is a great precision tool.

Photo 4 - Snap Fasteners on door


Site Content
With the first tool, place the button through the fabric. Slide the socket over the button shaft from the underside. Place the rounded surface of the button onto the anvil and using the driver and a hammer, strike the button shaft such that the shaft flares outward, gripping the two pieces together. In the case of the Press-N-Snap tool, place the appropriate dies in the tool. Again, place the button through the fabric and slide the socket over the button shaft from the underside. Place the fastener and tonneau into the tool and adjust the thickness using the vice-grip handle. Gently squeeze the handle, flaring the button shaft for a secure installation (Photo 7).

Photo 7 - Button/Socket Installation
Site Content
The forward edges of the tonneau are attached to four snap fasteners at the windshield edge of the dash. The process is the same for these as for the ones previously done on the doors. Place the tonneau on the car, stretch the edge over the snap fastener studs, mark, remove the cover, punch the next two holes (one each side), insert the button through the fabric, slide on the socket, crimp the two together.
The completed installation (Photo 8) leaves a cockpit hidden from prying eyes that will also keep dust and rain out of the interior.

Photo 8 - Finished Installation
This website uses cookies.
We use cookies to analyze website traffic and optimize your website experience. By accepting our use of cookies, your data will be aggregated with all other user data.